Prerequisites
The only requirement for Pixel.js is that you use a server to access the HTML file that we create in this guide. Due to security policies in some browsers (Chrome and Internet Explorer), certain aspects of the HTML5 functionality that Pixel.js utilises will not work if you try to run the file locally (i.e. by double clicking on your file from your file system).
Setting up a skeleton file
At bare minimum Pixel.js requires two things in your skeleton file:
- Pixel.js to be included in your file
- A container in which the game will be displayed
The container in the snippet above is the div element with the ID of game_container. This container is where our scene will be drawn. It should be noted, the container does not have to be a div element; it can be any block-level element you want.
Setting up the engine and game loop
Now that we have our skeleton file setup we can jump in and start creating the game! Create a new file entitled "game.js" and include it in the skeleton file previously created and add the following code:
The first thing we do is create a new Engine object which allows us to define required information, such as the ID of the container that we will draw our scene to, and the width and height of the scene.
After the engine has been setup, we then call the loadAndRun method of the Engine object and pass through an anonymous function to it; this will be our game loop.
Although this game loop will be familiar to existing game developers, the purpose of this should be clarified for newcomers. When writing games, you usually have a loop (such as the one in the above code) which will be called each frame of the game. In that loop you need to know the amount of time that has passed since you last rendered a frame; this value is passed via the dt parameter (a.k.a delta time).
The reason we need to know the time that has passed between rendering frames is so that if need be, we can compensate for a drop in frame rate . For the most part, your need for it will simply be to update what is happening in your game and running your game logic (for example checking to see if a player has died, if they've reached a high score etc.) as Pixel.js contains a number of entities and assets that handle this for you.
Setting up the assets directory
The assets (i.e. media files) that your game will utilise need to be placed within the assets directory. By default, the assets directory is a directory named "assets" that is in the same directory as your HTML file. If for some reason you need to change the location of the assets directory, this can be set in code by setting the value of the PixelJS.assetPath property.
For example, if we wanted to set our assets directory to be located inside a directory called "static" which is in our root directory, we would add PixelJS.assetPath = '/static/assets'; to the game.js file. For the purpose of this guide, we will assume that the assets directory is within the same directory as the HTML file.
Once you have decided on where the assets directory is going to reside, you need to create the following directories inside it (or at minimum the ones you intend to use):
- sounds
- sprite_sheets
- sprites
- tiles
For this example, we will be using a sound, two sprite sheets and one tile. Click Here to download the required files.
Adding a background tile
Once you have extracted the assets from the previous step into your project, add the following code before the call to game.loadAndRun:
We start off here by creating a new layer called "background". In Pixel.js, all your entities are added to a layer, which allows us to boost performance and allows you to control the positioning on the Z-axis of your components.
n.b. an entity in Pixel.js is an object which represents a component within the game, such as collectibles and players.
Once we have created the background layer, we use it to create a new entity, which will represent our grass tile. As we want this tile to span the entire background, we set its position to be at 0, 0 (i.e. the top left corner), and set the width and height to be 800x600; the same as our game scene.
As well as setting up our background tile, we also set the static property of the background layer to be true. Whenever a layer is used that doesn't have any objects which move or animate, the static property should be set to true to indicate that we only need to draw it once.
By calling the prepare method on the asset, we are specifying the information that asset needs to load when the loadAndRun method is called later. The loadAndRun method will handle loading all the assets that are prepared before the game starts to ensure no errors occur.
Adding a player
One of the built in entities in Pixel.js is the Player entity. This entity handles keyboard input for you and will move your character around on screen as you press the directional keys. The asset that we will assign to this entity is an animated sprite asset. Animated sprites load a sprite sheet and will animate through the sheet for you with the details you pass through to the prepare method.
To add our player to the game, add the following code after the initialisation of the grass tile:
We start off as we did in the previous section, by creating a new layer, this time for the players. We then create our player object and then add it to the player layer.
Once our player is on the appropriate layer, we then setup the player specific data such as the position, size and velocity.
n.b. the player's velocity is how fast it will move along the X and Y axis, so in this case, we have assigned it the same movement speed when moving both horizontally and vertically.
After the player information is setup, we then prepare the asset to be loaded. For the animated sprite assets, we pass through the name of the asset as we had done previously along with four properties specific to animated sprites.
As animated sprites are using a sprite sheet, we need to define how many rows and frames this sprite sheet consists of, the speed at which it should animate between the different frames and the frame it should display if not animating (i.e. the defaultFrame property).
The sprite sheet we are loading in the above code is the one that can be seen below.
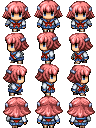
As you can see, we have three frames for each row, which when animated through will make the character appear to be walking.
The animated sprite assets let you specify which row the frames should toggle between, however the player entity handles that for us behind the scenes so that if the character is moving down we use the first row, if the character is moving left we use the second row etc. If you wish to use a different sprite sheet with the player entity, simply make sure the rows are in this same format.
Adding a sound effect and a collidable object
Now that we have a player that we can move around our scene, it's time to add something for them to collect! The first thing we need to do is create a new layer for our collectables and create an entity that will represent a coin; do this by adding the following code:
As you can see, we are following the same convention we did with our previous player object but assigning the asset to a generic entity instead as it doesn't have to be controllable by the user.
Now, we'll load the sound effect that should play when the player collects a coin and add the code to detect when the coin and player are colliding.
The collectSound object is created in the same way as our previous objects, we simply call the prepare method with the asset name. Once that is loaded we setup our onCollide callback for the player object created earlier and register both the coin and player entities as collidable objects on their respective layers.
The onCollide callback is fired whenever another entity that is registered as collidable collides with the entity. As can be seen in the code sample, this callback passes through the entity that it collided with, allowing us to check which object the player is colliding with.
If the entity the player has collided with is the coin then we play the collection sound and generate a new random position for the coin to appear in.
Adding a score
The final step to our game is to draw the score to the screen as the user picks up coins. To draw text in Pixel.js we simply call the drawText method of a layer object and specify the text we want to draw, the X and Y coordinates of where it should be drawn as well as the style information.
First of all we will need to create a variable to store our score in and create the score layer. To do this, add the following code:
Now that our layer is setup, we simply need to make sure that the scoreLayer is redrawn every time the score is increased and then draw the new text to the screen. To do this, we add the following code to the onCollide callback after we generate a new position for the coin:
The first parameter to drawText is the text we want to draw (in this case the score). The second and third are the X and Y coordinates to place the text at. The fourth is the font that should be used, the fifth is the colour and the final parameter is how to align the text (left, center or right).
Finished Code
The game is now finished in a mere 85 lines of code! The finished code now looks like this: