Today I’m going to show you how to hook up an LM35 temperature sensor and read the room temperature from it.
This is a very common temperature sensor that you’ll be able to pickup at a number of places for a very reasonable price. A quick look on eBay suggests they are going for about $0.99 each in the USA and around £0.50 in the UK.
The things you will need for this tutorial are:
- An Arduino board
- An LM35 temperature sensor
- Three jumper cables
- A breadboard
First of all, let’s identify which pins are which on the LM35 itself. One side of the sensor will be rounded, and the other will be flat. With the flat side facing towards you, and the pins facing down, the pins from left to right are: 1, 2 and 3, as can be seen in the illustration below.

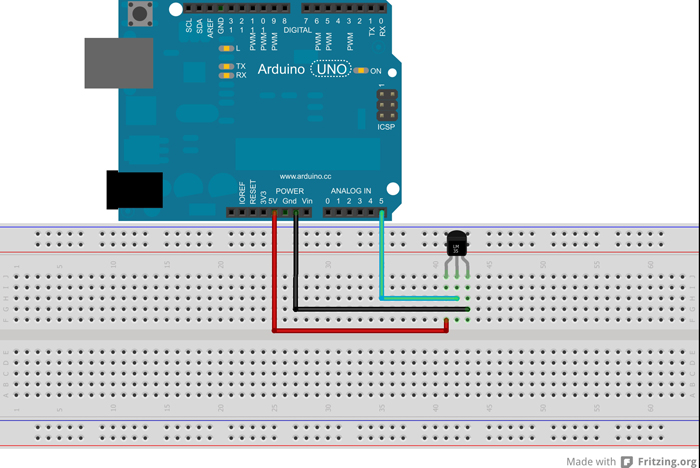
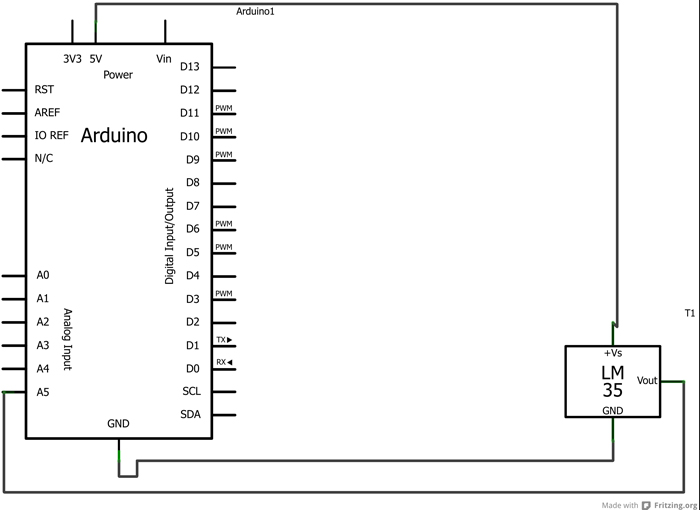
Plug the LM35 into your breadboard and place jumper cables from pin 1 to 5v on the Arduino, pin 2 to an analogue pin on your Arduino (for this example we’ll use analogue pin 5) and pin 3 to the GND pin on the Arduino.
We now have our circuit, which should look like this:
Now that our circuit is done, we can put some code behind it. Load up the Arduino IDE and copy and paste this code into a new sketch:
float temperature;
int reading;
int lm35Pin = 5;

void setup()
{
    analogReference(INTERNAL);
    Serial.begin(9600);
}

void loop()
{
    reading = analogRead(lm35Pin);
    temperature = reading / 9.31;
    Serial.println(temperature);
    delay(1000);
}
At the top of the file we have three variables that we need later on:
temperature– this is where we will store the temperature in centigrade (if you want to use fahreinheit just alter the calculation accordingly)reading– this is where we will store the raw reading from the analogue pin prior to any calculationslm35Pin- this is where we will store the pin number that we are reading from
In the setup method we make a call to the analogReference method. This allows us to set the reference voltage of the Arduino (i.e. the value used as the top of the input range). The reason we are using this is because the LM35 only produces voltages from 0 to +1V, and setting the reference voltage to INTERNAL will set it to 1.1 volts, as a result significantly improving the precision. The second line of the setup method is simply to allow us to read the data we are gathering via the Serial Monitor window (found under the Tools menu).
Inside the loop method, we begin by reading the value from the analogue input, and then divide that reading by 9.31. The reason we divide by 9.31 is because the range of our reading is 1024 and as we have set our reference voltage to be 1.1 volts we calculate each “step” in the analog reading as being approximately equal to 0.001074 volts, or 1.0742 millivolts. As the LM35 reports 1 degree Celsius per 10 millivolts, this means that for every (10 / 1.0742), we detect a one degree change i.e. every 9.31; so by dividing the reading by 9.31 we get our temperature reading in Celsius.
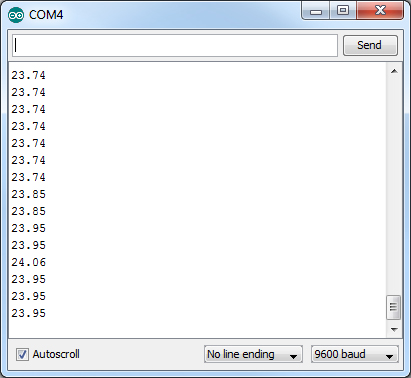
The following lines of code simply write the temperature to the Serial Monitor and then delay execution by a second (for the sake of not spamming the Serial Monitor!).
If all worked you should see something to the effect in the screenshot below.
If for some reason changing the reference voltage is going to be an issue for your project and you don’t mind less precise results, you can remove it and change the temperature calculation to temperature = (5.0 * reading * 100.0) / 1024; This will give you less accurate results though, so unless you really can’t change the reference voltage then leave the code as is.